Congratulations on filing your Annual Income Tax with Taxumo! Along with that Annual ITR Filing, Taxumo also submits, if applicable, your Summary Alphalist of Withheld Taxes which includes the details of the Form 2307s you received from your clients.
Now there is one more step for you to do and this is submitting so called “ITR attachments.” This part is easier for you if you used Taxumo to file your AITR. We’ll take care of generating and showing you all the necessary attachments for your EAFS submission (in particular, the ones that you entered in Taxumo).
Unfortunately, submitting via eAFS is not a task that Taxumo can currently do for you given that each taxpayer is supposed to have their own account/access to the eAFS tool. We are conversing with the BIR to see how we can also submit this for you though and hopefully, in the future, this is a service we can provide.
Anyway, going back — What are the ITR attachments? These attachments include:
- Any Form 2307s that you used to claim your tax credits
- The BIR confirmation that the SAWT file has been received for the claiming of the Form 2307s
- Any previous filing if this is an amendment filing (and the corresponding proof of payment)
It sounds like a lot but read on and we’ll guide you through the process of filing your ITR attachments, step-by-step (assuming you filed on Taxumo, of course). Let’s get started!
How to download your ITR attachments from Taxumo
We’ve made it easy for you to access and download most of the required files within the Taxumo app. Simply follow these instructions:
- Login to Your Taxumo Account.
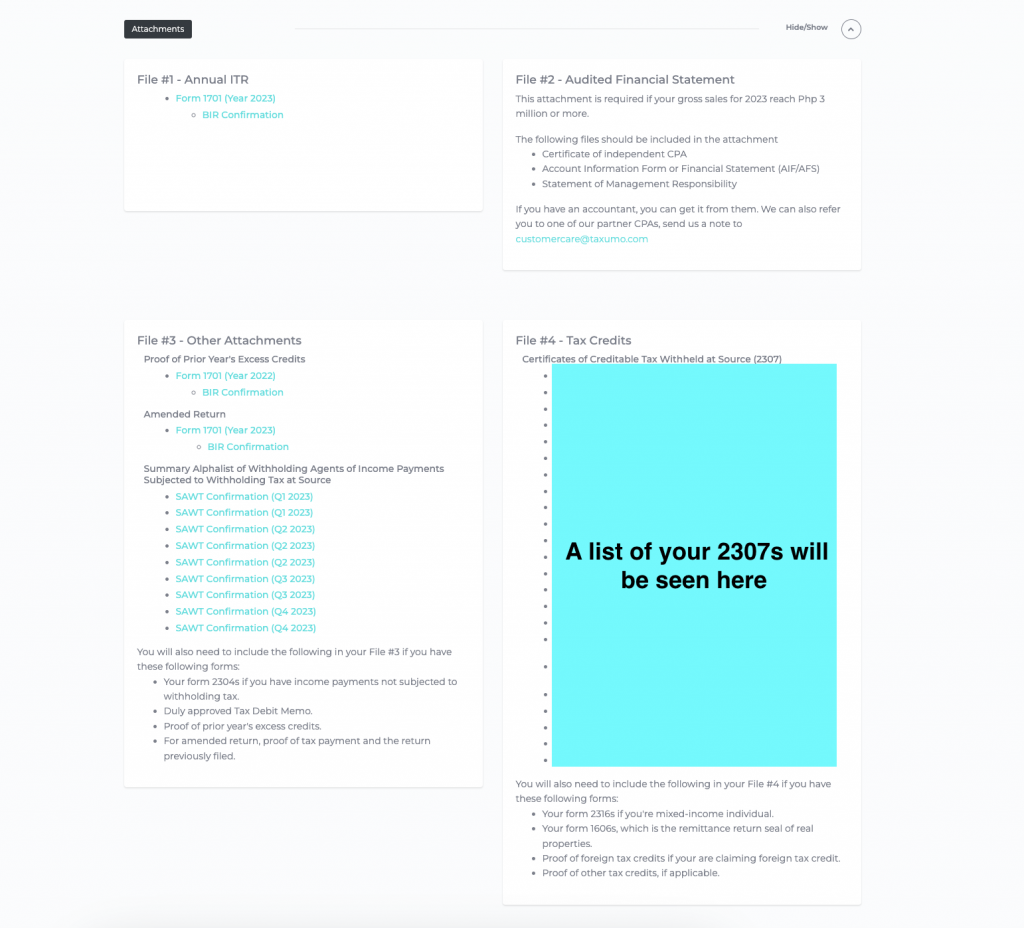
- Go to the “eAFS” tab on the left side of the screen right under the “Tax Dues” module. You will be presented a screen where most of the necessary attachments can be downloaded. We say “most” since we currently don’t have a copy of your 2316 if you are a mixed income earner and a copy of your AFS if you have one. Just read the copy of what else is needed as we have indicated the documents in the list.
- Download the files that you need. This is a sample of what you will see…

How to Download Your Form (AITR forms: 1701, 1701A)
- Click on the appropriate form that you wish to download.
- The form will open in a new browser tab. Click on PRINT on the upper right side of the screen.
- Select SAVE AS PDF (or a similar option) for the destination and click SAVE. If that option is not available, you may need to download a PDF printer that allows you to Print to PDF.
- Your file should then download to your chosen location in your computer.
If you haven’t filed your AITR through Taxumo – please consolidate the AITR form that you filed for this calendar year. But if you’re curious on how to file for your AITR next year or any tax forms that you wish to file through Taxumo, learn how here: https://www.taxumo.com/blog/how-to-file-late-taxes-online-in-a-few-minutes/
How to Download Your Other Attachment Files
- Click on the file that you want to download (In Taxumo, it’s labeled SAWT confirmation and we also have the list of your 2307s)
- The file should automatically download to your computer.
You’ll have to compile all your downloaded attachments into different files. We have already indicate the split of the different files into different file numbers (as seen above).
This comprehensive user guide will teach you how to compile your attachments whether you’re using Windows or Mac OS: How to merge your attachments into a single file (Windows or Mac)
How to Properly Rename Your Files According to BIR’s Naming Convention
You have to rename the compiled attachments to the prescribed naming convention of the BIR as listed below:
File #1 – EAFSXXXXXXXXXITRTYMMYYYY / EAFSXXXXXXXXXITR#QMMYYYY
File #2 – EAFSXXXXXXXXXAFSTYMMYYYY
File #3 – EAFSXXXXXXXXXOTHTYMMYYYY
File #4 – EAFSXXXXXXXXXTCRTYMMYYYY-01
*where XXXXXXXXX is your 9-digit TIN
*where MM is the Month end of the taxable year (if Annual filing)
*where YYYY is your taxable year
and where 01 – is the first file in the series (File #4)
Submitting your AITR Attachments Using eAFS Submission Portal
If have your files ready, let’s go ahead and learn how to submit them to the BIR using eAFS.
Just follow these easy steps:
1. Go to the eAFS Website at https://eafs.bir.gov.ph/eafs
2. Create an account by clicking on NOT REGISTERED?
3. Complete the account registration form and click on SUBMIT.
4. Verify your account by clicking on the link sent to your email. Login to your eAFS account using the username and password that you created.
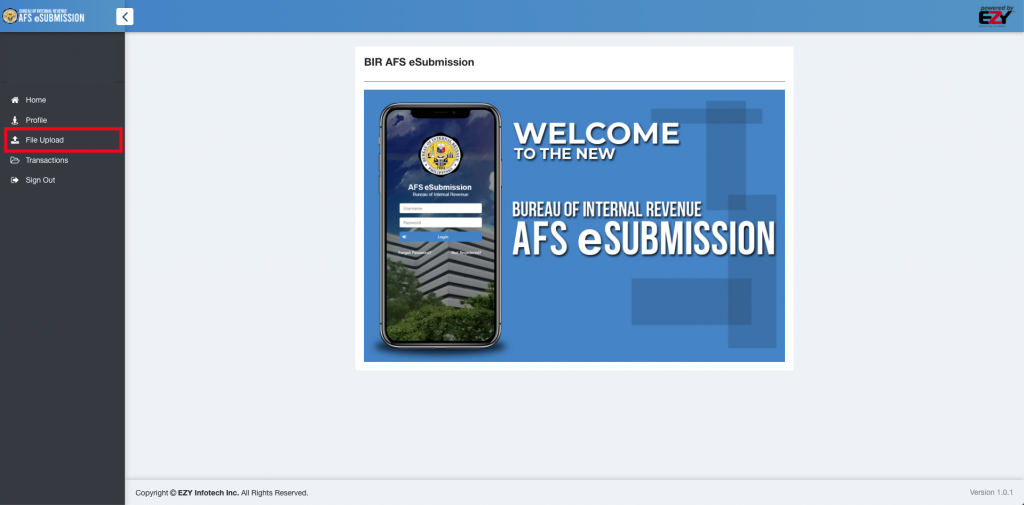
5. Click on File Upload on the left side of the screen.

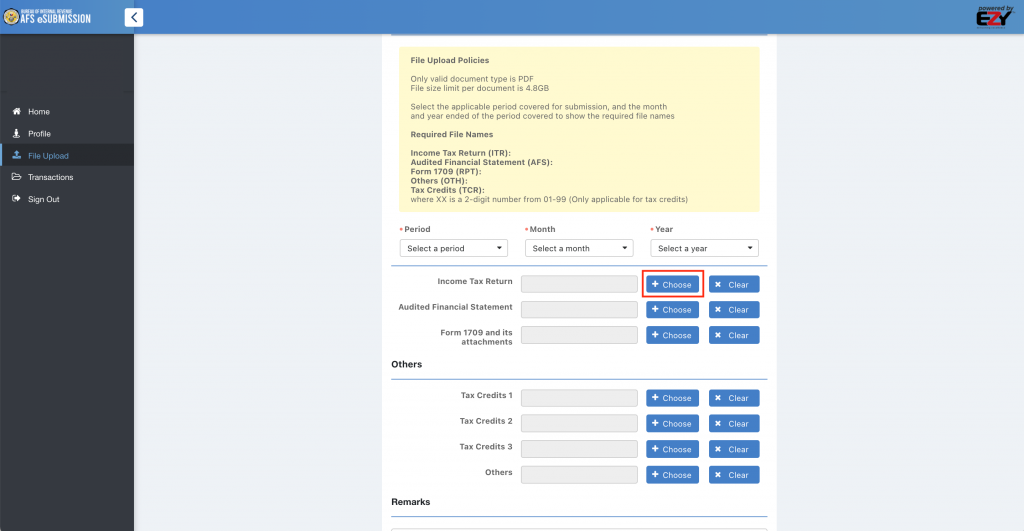
6. Upload your File #1 by clicking on the Choose button on the row of Income Tax Return. Wait for the file to completely upload and repeat these steps for File #2, File #3, and File #4.

7. Click the submit button at the bottom of the page after you have uploaded all the attachments.

8. You will receive a confirmation email from the BIR with the transaction number for your submission.
And now you’re done! If you need help about your AITR attachments, send us a message by clicking on our chat box as seen here on the lower right corner of our website.
Submitting tax attachments should always be quick and easy. Spend more time on the things that you need to focus on the most in growing your business.

Hello,
I normally file only via EBIR and SAWT. If I am NONVAT using an 8% flat rate, so with 2307 issued by different companies. Do I still need to upload via EAFS? I only recently found out about this..arrgh.
Hello RBG,
Good day!
Yes, that is correct! All are required to submit their income tax forms and other attachments to the eAFS portal regardless of the tax rate and if they are VAT or non-VAT type. 🙂
Hi, just wanted to ask if I can resubmit audited FS because I forgot to include some documents.
Hello Shan,
Yes you still can 🙂
Hi. Is this article up-to-date?