

Ever felt overwhelmed by all the rules and regulations about receipts? Is it your first time writing receipts?You’re not alone! We know taxes can be a headache, but we also know how much you care about your business. That’s why we created this simple guide to writing Non-VAT Official Receipts.
Think of a receipt as a high-five for your customer – a way to say “thanks for your business!” It also keeps everything official with the government, so you can focus on what you do best – running your awesome business.
We built this guide for real Filipino businesses, so you can be sure it follows all the Bureau of Internal Revenue (BIR) rules. Let’s break it down step-by-step.
Prepare the documents and requirements
Step 1: Calculate and Collect the Amount of Sales
Before anything else, ensure you’ve collected the payment. If it’s cash, have it on hand; if it’s a check, make sure it clears first. Remember, if withholding tax applies to your transaction, you’ll need to get a Certificate of Tax Withheld (BIR Form 2307) from your customer / client.
Step 2: Fill in the Details of the Sale
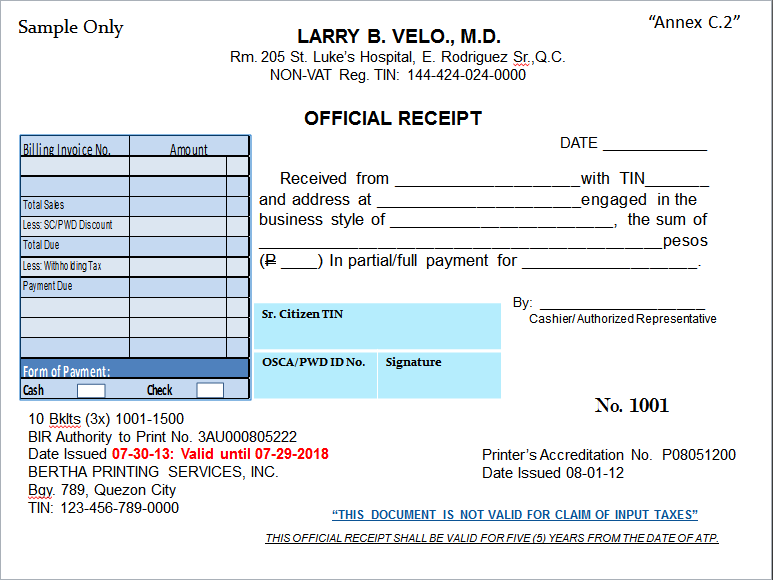
An official Non-VAT receipt must include:
- Date of the transaction
- Name and address of the customer
- Customer’s Taxpayer Identification Number (TIN), if applicable
- Business style or nature of service
- Total amount received
- Check if payment is in full or partial
Step 3: Break Down the Amount Collected
On the left side of your receipt, clearly state the total sales and deduct any discounts or withholding tax as required. The Payment Due is your gross sales less these deductions.
A common mistake that we see it that some tax payers add percentage tax to the total sales. This shouldn’t be the case as Percentage taxes are and should already be part of the total sales amount that you receive. This tax isn’t even shown as a separate line item in your receipts.
Step 4: Confirm the Payment Method
Mark the appropriate box to indicate whether the payment was made in cash or by check. If it’s by check, include the check number, bank name, and the amount.
Step 5: Finalize the Receipt
Ensure the receipt is signed by the cashier or an authorized representative. This is your validation that the receipt is official and recognized by your business.
A Handy Summary for Quick Reference
Check the following before issuing your receipts
- Calculate and collect the amount of sales.
- Write the details of the sale.
- Make a breakdown for the amount collected on the left side.
- Quickly check if the customer paid you with cash or check.
- Ensure the official receipt is signed by the cashier/authorized representative.
Official receipts serve as crucial financial records for your business, embodying clarity, accuracy, and security. Under Taxumo’s expert guidance, managing receipts transforms into a seamless and confident process. Embracing receipts in your daily business operations is not merely a best practice—it ensures compliance with tax laws and fosters transparency with your clients.